Make a Hybrid Keychain
Saturday, May 26, 2018
I'm preparing to go to a mixed media art retreat, Art and Soul Colorado, in just a few days. One of the fun things I'm looking forward to is doing trades...in other words, any participant who's interested makes us a small item to trade with others in between classes. Some make artistic trading cards, small figures, or pins. I wanted to do something a little different, so after doing some research about trades, I opted to make these key chains. Out of necessity, I needed to make something that would be light and not too heavy in my luggage, as well something that wouldn't bog me down as I carried my bag of trades around at the retreat.
I was excited to make these, not only because they'd be different, but because they look so cool. They are pretty easy to make if you have everything you need. Here's a supply list if you'd like to your hand at this. For each keychain, you'll need:
-a cork (can be used as long as it's not damaged)
You can get a bag of several corks from amazon: https://www.amazon.com/gp/product/B003XZ54BO/ref=oh_aui_detailpage_o03_s00?ie=UTF8&psc=1
-lobster keychains (also found on Amazon): https://www.amazon.com/gp/product/B06XGMKM6R/ref=oh_aui_detailpage_o05_s00?ie=UTF8&psc=1
-2 small washers (1/2 in or 12.7 mm)
-2 larger washers (3/8 in or 9.5 mm)
-two head screws (also commonly called eyelets)
-small strips of patterned paper, washi tape, or thin ribbon (use your stash!)
A larger, thicker ribbon to put on the bottom of your keychain (cut into a strip about 1/2 - 3/4 in. wide and about 3-4 inches long)
-E6000 glue (the one with the pointy tip, not pictured)
-a toothpick, if you don't have the glue with the pointy tip
-scissors and pinking shears (not pictured)
You can see my video of the process below:
If you'd prefer a step by step without watching the video, just follow the steps below.
Step One: Gluing on the Washers
Using the E6000 glue, adhere one of the large washers to one end of the cork. Allow to dry overnight to prevent headaches when assembling the rest of your keychain(s).
The next day, glue one of the small washers onto the top of the larger washer. Again, allow it to dry overnight.
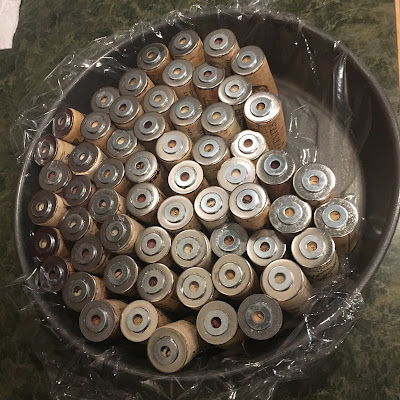
I let my corks dry overnight in a cake pan lined with plastic wrap. It was an easy and efficient way to let them dry without the corks and washers slipping all over the place.
When the corks have both washer sets completely dry on one side, repeat the process with the other side.
Step Two: Insert the Eyelets/Headscrews
Once the eyelet is removed, take a toothpick and cover the bottom half of it with the glue. Push the glued-up pick inside the hole you created with your eyelet, then pull it back out. If you have the glue tube with the pointy tip, you can try pushing a bit of glue into the hole with that. When the adhesive inside the hole, screw the eyelet back down into the hole again until it is tightly up against the small washer.
Repeat this process with the glue and another eyelet on the other end. Your key chain should now look like the one in the photo above. Lay flat and allow to dry overnight, one more time.
Step Three: Add the Key Chain Attachment and Washi and/or Patterned Paper
Choose one end, and put on the key chain. I personally liked using lobster keychains, because they have a hook that's quick and easy to attach, but it's possible to thread the standard circular key chains around the eyelet; it just takes a bit longer.
On the same end as the key chain, wrap washi tape on the cork as close as you can to the large washer. Or, if you prefer, take a small, thin strip of digital or traditional patterned paper with the glue. Washi tape is easier to use, since it's self-adhesive, but it's not hard to glue on paper. You can see my key chain below that has paper instead of washi.
I suggest letting key chains made with paper trim dry for a good, long time. Drying time doesn't necessarily take overnight.
Step Five: Add a Ribbon loop
To add your ribbon loop, take your small length of ribbon and cut the ends with pinking shears (which keeps your ribbon from fraying). Fold your ribbon in half, then thread the loop through the eyelet. Take the loose ends of the ribbon and pull them through the loop through the ribbon. Pull the ends securely through the loop and snug the ribbon up through the eyelet. You can see the ribbon as I've looped it through the head screw in the picture above.
The key chain is finished, and making it is pretty easy!! The most time consuming part is the drying time, but once that is done, the rest of the key chain is quick to assemble.
Here's a small sampling of the a few of the key chains I made. I used plaid ribbons for the bottom of the chains, but any ribbon you prefer could easily be substituted.
Thanks for checking out this project and I hope you'll let me know if you give making the key chains a shot.
Have a great day!


